MITRE eCTF memcmp() Side Channel Analysis
MITRE eCTF memcmp() Side Channel Analysis
Background
In MITRE’s 2025 eCTF, each team implemented a satellite encoder and decoder. The decoder had team-specific firmware running on the MAX78000FTHR board which would decrypt encrypted frames coming from the encoder and process subscriptions to these frames. As an attacker, we had full Man-in-the-Middle access between the encoder and decoder. Therefore, we could intercept frames and subscription files and modify at will. Depending on how teams setup this interaction, if we could forge arbitrary frames and/or subscription files that would be accepted by the decoder we would get a flag.
The memcmp() side channel attack was used against a handful of teams that year to brute force secrets that allowed us to forge subscription files and/or frames. While it was used in a couple of different ways, I will cover how we used it to defeat the Tufts Team’s design.
Their subscriptions were generated on the encoder using the following code:
1 | def gen_subscription(secrets: bytes, device_id: int, start: int, end: int, channel: int) -> bytes: |
We have no encrypted data here, only 4 pieces of information that are in plaintext. However, a SHA256 HMAC was generated using an unknown and randomly-generated key. HMACs are hashes that also use a key to produce a key-dependent hash, providing integrity checks for data. The idea is that even though the 4 pieces of information are in plaintext and easy to modify, without the knowledge of the key, an attacker wouldn’t be able to create a valid HMAC signature. Therefore, when the decoder receives the subscription file from the attacker, they would see the 4 pieces of information, calculate their own HMAC using the hard-coded key (known by encoder and decoder but not attacker), and find that the HMAC they calculated is different than the one provided in the subscription file. Therefore, the decoder would mark the data as invalid and reject it.
Here, the vulnerability relies on how the decoder knows that the HMAC they calculated is different than the one in the subscription file - using memcmp().
memcmp()
The C code for Team Tufts that generates and verifies the SHA256 HMAC is as follows:
1 | bool verify_signature(const uint8_t *data, size_t data_len, const uint8_t *signature) |
data and signature come from the subscription file, and dataLen is 24. Most of the code is using the WolfSSL library to generate a SHA256 HMAC, but the last line uses memcmp() to determine if signature (attacker-provided) and computed_sig (decoder-provided) are the same.
The decompilation for the memcmp() function from Ghidra is below:
1 | int memcmp(void *s1,void *s2,size_t n) { |
Even though it looks a little complicated, the essence of memcmp() is a for loop; It loops through n bytes of data and sees if s1 and s2 are the same. The moment the data is not the same, it exits. Therefore, by brute forcing HMAC values and measuring the time it takes for the subscription update to fail, an attacker can determine which bytes are correct and which are incorrect.
As an example, let’s say s2 (signature generated by the decoder) is cccccccccccccccccccccccccccccccc. As an attacker, we don’t know any of these values, so we’re going to send a subscription file (with our modifications in it) along with the HMAC format ?xxxxxxxxxxxxxxxxxxxxxxxxxxxxxxx where ? is some byte. We will then send this subscription file to the decoder with \x00 as the first byte, then \x01, then \x02, all the way up to \xff and measure the response times for each one. Which ever one took the longest to return is the correct byte. This is because sending a as the first byte will cause memcmp() to compare a and c, and those are wrong, so it will immediately return. However, when we send c as the first byte, memcmp() will compare c to c (which are the same), so it will continue and compare the SECOND byte x to c, and since those are different it will immediately return.
The time difference between the correct value and incorrect values is only a couple of instructions, but that is enough for us to leak HMAC values one byte at a time.
memcmp() Intricacies
As you may have noticed, the decompiled source code for memcmp() I provided above is not as simple as my explanation. The implementation I described would look like this:
1 | int memcmp(unsigned char *s1, unsigned char *s2, size_t n) { |
Instead, to optimize the comparison, memcmp() takes the addresses in s1 and s2 and casts them into int *. Since ints are 4 bytes, it uses the entire bitspace of the register to compare 4 bytes at a time. If that was it, we’d be in trouble since we’d have to brute force 4 bytes at a time instead of 1. However, memcmp() doesn’t just return whether or not it’s the same, it also returns the difference between the two bytes that differ.
Therefore, if the 4-byte int comparison fails, the function actually does extra instructions and reverts back to a byte-by-byte comparison so it can identify which byte of the 4 is different and how different it actually is. This leads to some interesting behavior when doing timing analysis on every fourth byte.
Let me break it down here for you. Let’s say that we’re comparing aaaaa with user-provided data bxxxx. We will do:
1 | SITUATION 1 |
Now let’s say we’re comparing aaaaa with aabxx:
1 | SITUATION 2 |
Now let’s say we’re comparing aaaaa with aaabx:
1 | SITUATION 3 |
Finally, let’s say we’re comparing aaaaaaaa with aaaabxxx:
1 | SITUATION 4 |
What this means is that if byte 4 is wrong (SITUATION 3), it will actually run MORE instructions than if byte 4 is correct and byte 5 is wrong (SITUATION 4).
Therefore, for bytes 1-3 we’re looking for which one takes longest to run, but for byte 4 (and all multiples) we’re looking for the one which takes shortest to run.
We first discovered this by accident when creating a PoC by brute forcing a known HMAC value, and we noticed every fourth byte had the correct character taking the shortest amount of time. This just required a simple addition to our scripts but was vital to our understanding.
Exploitation
Recap
Okay, so our goal is to create our own subscription file (with forged timestamps + channel numbers) and leak the valid HMAC for the data by determining how long it takes the decoder device to fail. We send all possible 256 bytes values for the first byte and see which one takes the longest, accepting that byte as the first known value of the HMAC. Then we do the same thing with the second byte value, continuing all the way until all 32 bytes of the HMAC are leaked. Lastly, every fourth byte we are looking for the one which takes the SHORTEST amount of time, not the longest.
Approach 1
Okay, but how do we actually time the data in a way that’s accurate enough for us to reliably determine which byte takes longest/shortest? Our first approach was timing through the host computer. The MAX78000FTHR microcontroller (our decoder) was connected to our Linux host computer and communicating through a serial UART connection. When any messages are sent, a confirmation ACK is always sent by the decoder, marking it received it. The host data is what sends the subscription file to the board, so we just captured the timestamp right after we received the ACK, captured the timestamp right when we got a message over UART saying our HMAC was invalid, and subtracted the two.
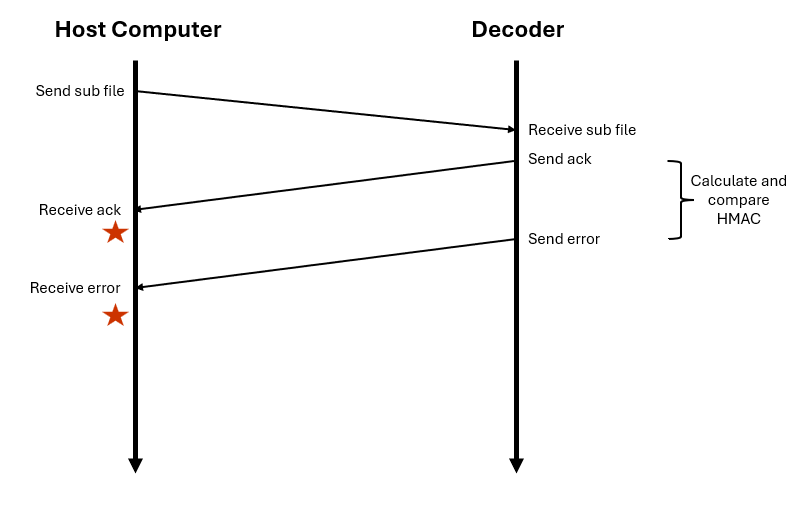
In the diagram above, the red stars indicate when we started and stopped our countdown. Theoretically, it should have worked; in practice, it did not.
The MAX78000FTHR microcontroller is based on the MAX78000 SoC, which has an ARM Cortex-M4F CPU on it. While it can be set to run at 100MHz, the default clock speed is 60 MHz. Assuming it’s running at 100MHz (worst case scenario), this means each clock cycle takes 10 nanoseconds to run. A single instruction takes multiple clock cycles but usually under a dozen. Since the timing differences we’re looking for here is a matter of only a few instructions, this means we’re dealing with hundreds to perhaps thousands of nanosecond differences, which is really small. It seems that the jitter coming from UART transmissions or internal to the host computer was large enough that it encompassed the small timing difference we were looking to observe.
We knew this was the case because we took a legitimate subscription file we had received, sent the data, and tried to brute force the HMAC value as if we didn’t know what it was. Since we knew what it should be, we had some ground truth to compare our data to. Even with a couple thousand repetitions per byte over several hours, we couldn’t distinguish the first correct byte over the others. Perhaps with even more runs it would have eventually worked, but it was taking too long to be very feasible even in a semester-long competition.
Obviously we were going to need something a little more complicated and hardware-focused to get our data.
Approach 2
Our second approach was to eliminate any host computer jitter and UART-traveling-through-wires jitter. Instead, we’d calculate times based on the instant the UART data left the decoder.
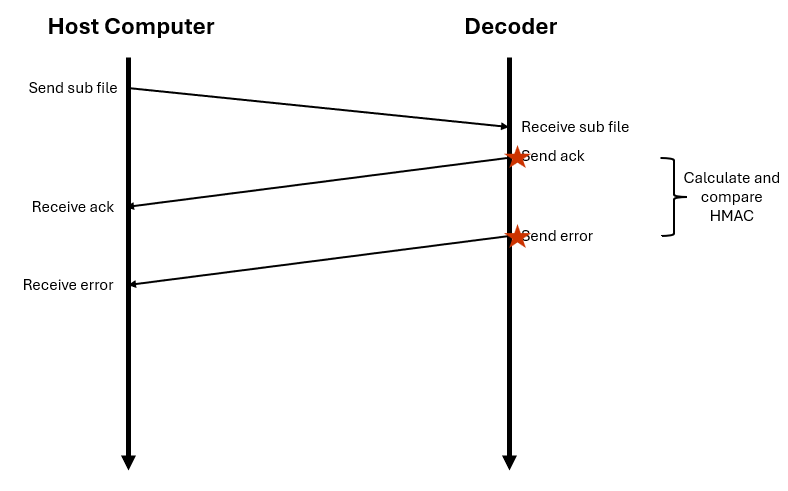
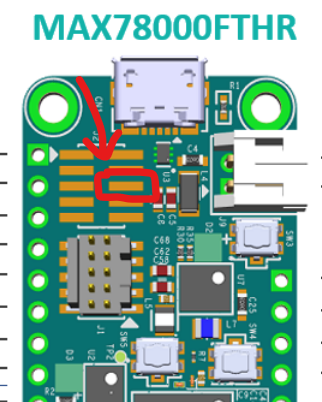
How did we measure that? The MAX78000FTHR board schematics showed that there was a 2x5 set of pads exposed on the board with P0_1_UART0_TX and P0_0_UART0_RX, the UART lines. By hooking up a Saleae Logic Pro analyzer to the TX pad (which would sent the ACK and error) and capturing the data, we could programmatically parse the output and timestamps to determine how much time was between the moment the ACK finished sending and the moment the error started sending.
After a lot of time spent automating the data capture and analysis through the Python logic2-automation library, determining the minimum number of repetitions needed for accurate results, and automatic statistical analysis of the results to identify the outlier was sufficiently calculated, we created a behemoth of a script that would byte-by-byte retrieve the entire 32-byte HMAC of a given subscription file.
Solve Script
Our solve script is located at memcmp.py.
Our steps were we:
- Created a subscription packet that would give us flags
- Start capturing data from the Saleae logic analyzer on the TX pad
- Send the subscription packet with all bytes from 0-255 as the beginning of the HMAC (repeating each byte
REPSnumber of times, usually 150-200, and with aLISTcommand in between) - Stop capturing data
- Automatically analyze the data using Logic2’s builtin UART analyzer to create a table of values and timestamps
- Export the table to a CSV file
- Read in the CSV file to the Python script
- Identify where the subscription file acknowledge was sent and where the invalid HMAC error was sent
- Calculate the difference between the two for each rep of each byte, appending to a list
- Calculate the average runtime for each byte across all reps
- Plot the average runtime for each byte and do stats calculations like outliers and Zscores
- Based on the stats calculations, we either determined the min/max byte was accepted as the correct HMAC byte, or we needed to run it again to be sure
- If stats told us we had a min/max but it didn’t look clear enough, but across two runs it got the same byte, we would accept that as being valid anyways
- Saved the plot and current HMAC progress to disk
- Emailed the plot to us so we could remotely monitor our progress
To set this up for easy remote access, we made the host computer SSH-accessible. In two separate tmux terminals, we ran Logic Pro 2 using the command xvfb-run ./path-to-logic-executable --no-sandbox (xvfb so it would run even though it’s a GUI program on the terminal) and our automation script in the other one. If we looked at the plots emailed to us and determine we messed up or needed to run something again, we could SSH on, open the tmux terminals, and stop/restart both the script and Logic Pro 2. Note that when an entire HMAC was captured, we had to return in person to flash the board again so no sub files were located on it.
Our plotted diagrams looked like this:
Limitations
Looking back, we’re a little surprised that it actually worked, especially considering how complicated and low-key jank it was. One thing in particular that we’re surprised wasn’t a bigger issue was the baud rate of the UART communication. The devices were set to use the 115200 baud rate, meaning it could send 115200 bits/second. This means each bit takes ~8.68 microseconds to transfer. While that’s a small amount of time, it’s several of orders of magnitude larger than a clock cycle and even our timing range we’re looking for (approximately 50 ns - 1us).
What that means is if the incorrect byte returns from memcmp() even 1us earlier than the correct byte, it may need to wait up to 7us before the error message is even sent out over UART. This increases the likelihood that the timing difference is swallowed up in the UART baud rate, making Approach 2 in effective. However, since it worked for us with only 150-200 reps per byte, apparently the UART baud rate didn’t make enough of a difference. Also note that 115200 is on the higher end of baud rates, other common ones are like 9600, which is 10x slower and probably would’ve made our timing oracle useless.
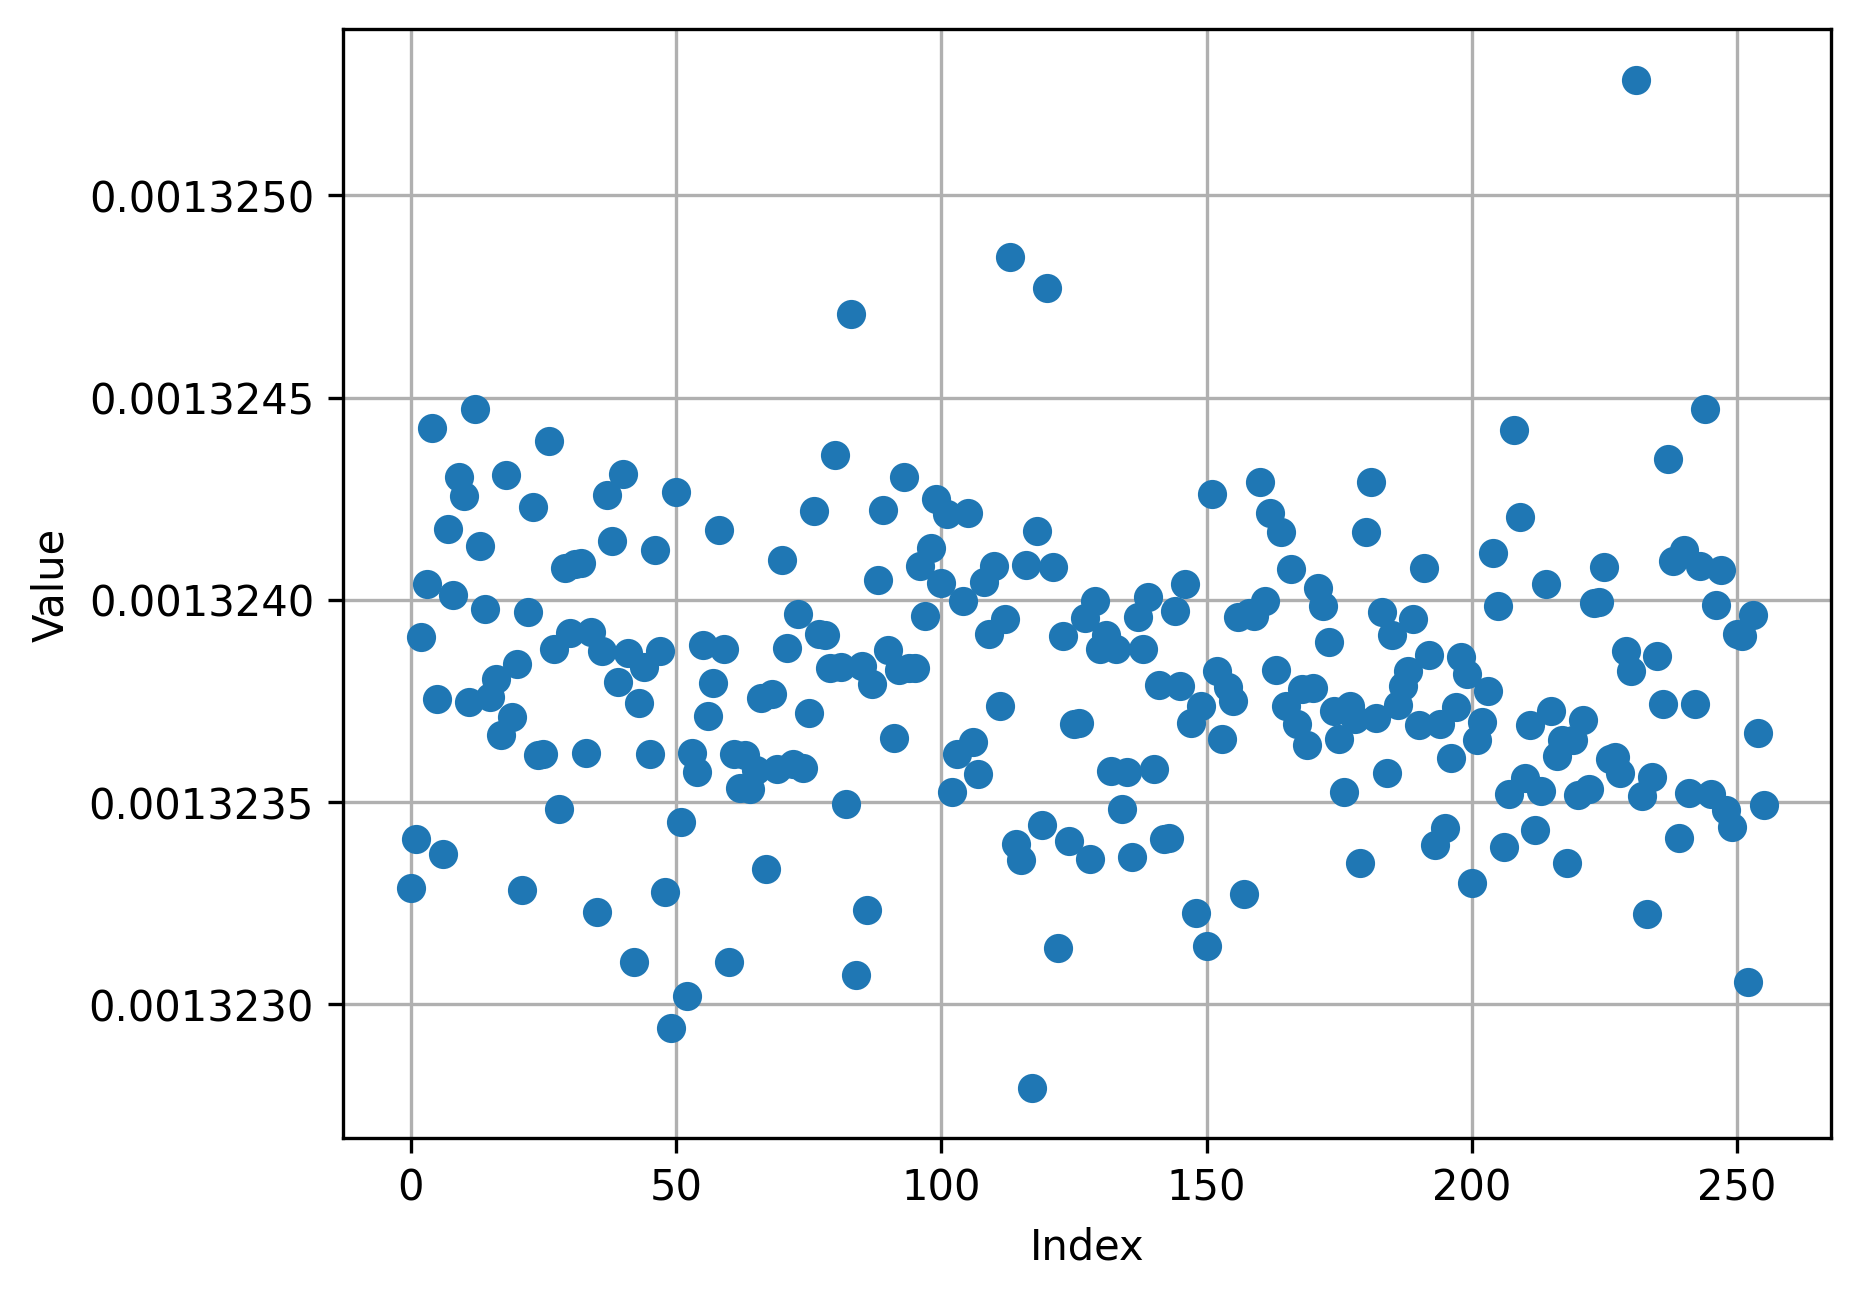
This is apparent in one plot I made of trying each byte (x-axis) only once (plotting time on the y-axis in seconds).
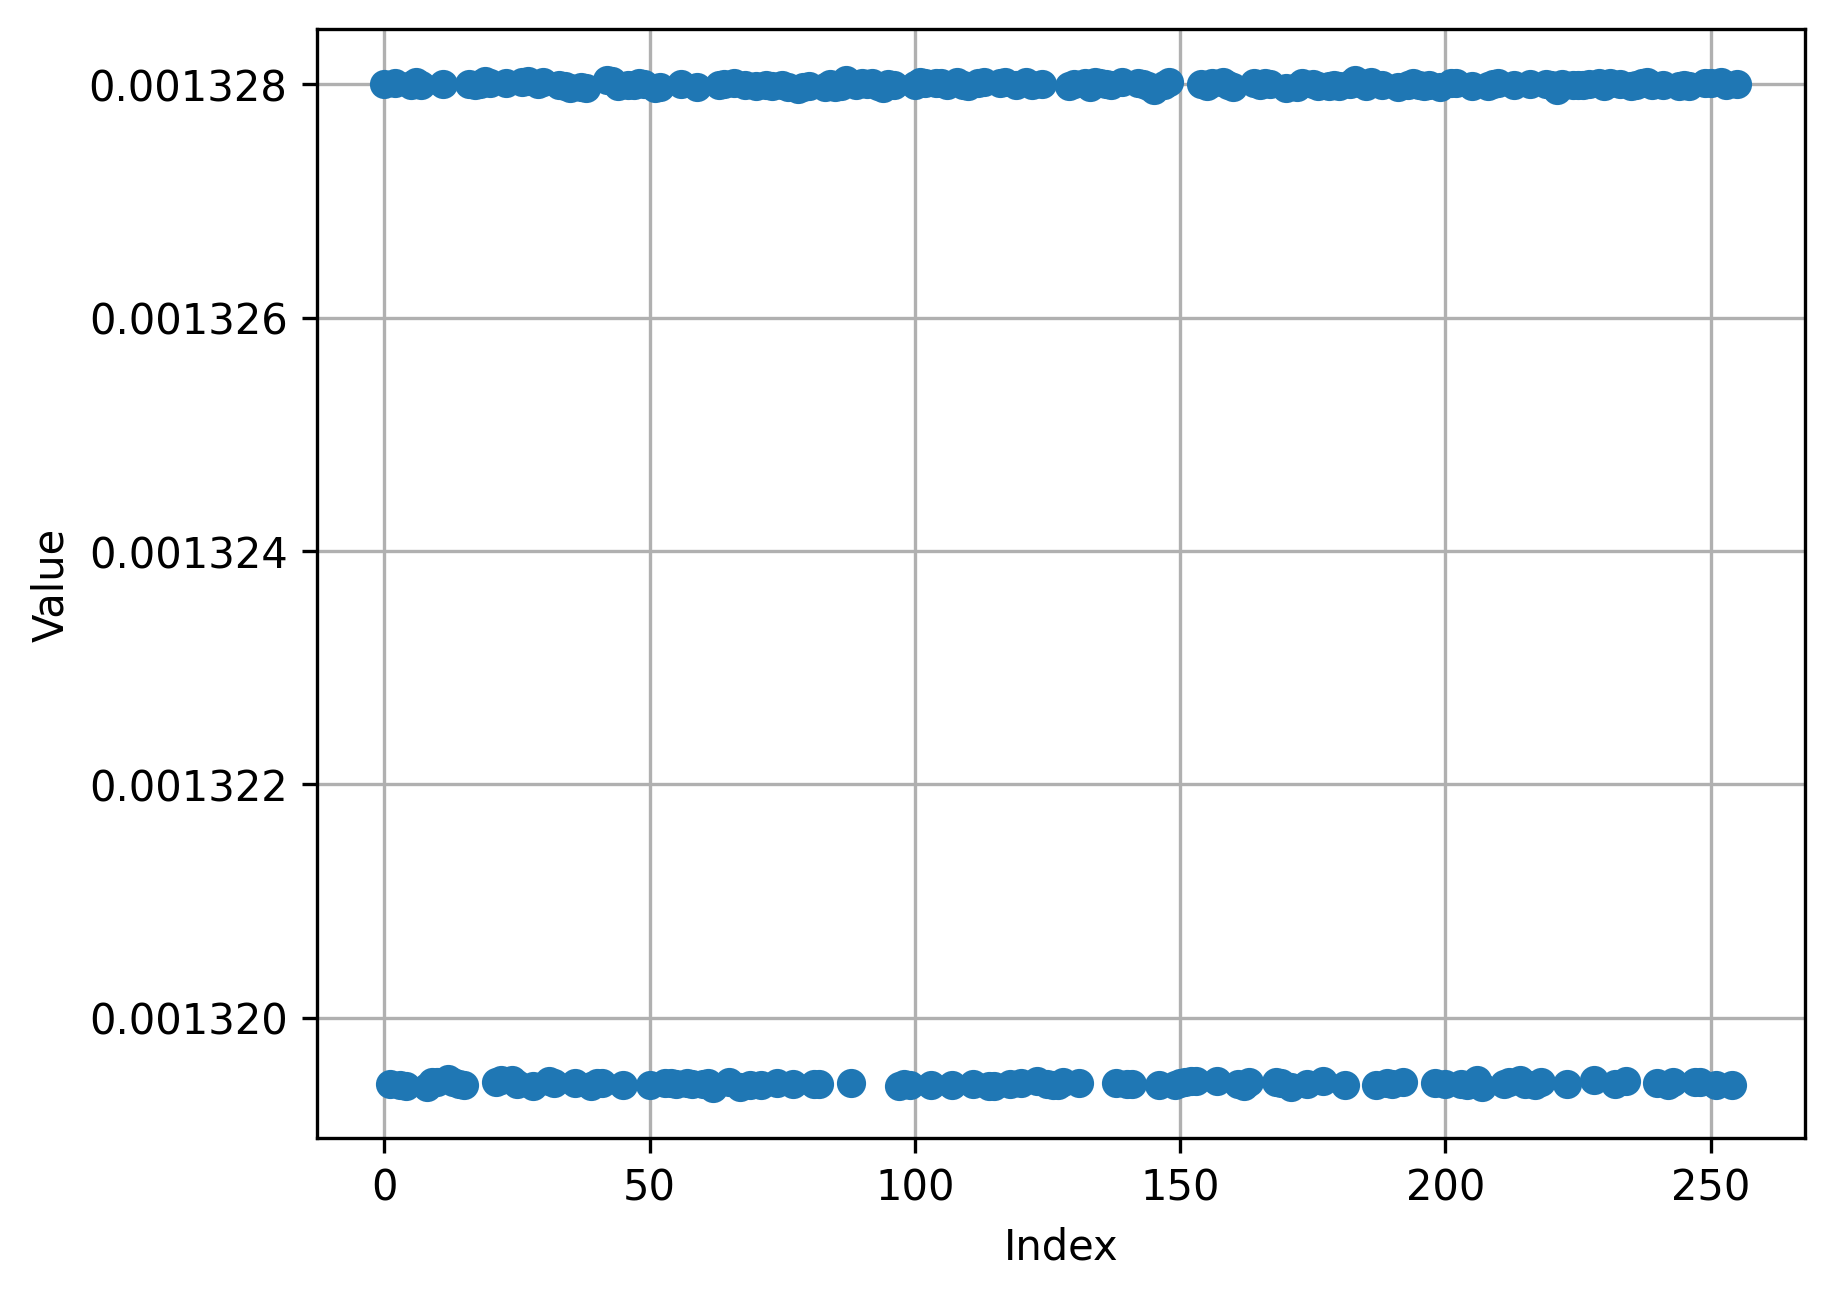
All times were either one of two times, namely 1319.5 microseconds or 1328 microseconds (difference of ~8.5us, the time it takes 1 bit to be transferred over the 115200 baud rate). Even the correct byte was always in one of the two time buckets, it just appeared in the upper time bucket more often than the others.
Approach 3
After talking with other teams once the competition had ended, a few teams also exploited the memcmp() side channel but using a different timing oracle. The reference design provided to teams often changed LED colors when different conditions were met or different functions had run. Therefore, they used another MAX78000FTHR board or other microcontroller running at 100 MHz, connected a probe to a resistor connected to the LEDs, and used a SysTick timer to track the number of clock cycles or timestamps at which the LEDs were turned on/off. Since this didn’t rely on the UART baud rate, it’s significantly more reliable as it can measure clock cycles. However, if a team decided not to leave in functions affecting the LED, this data collection vector wouldn’t have worked.
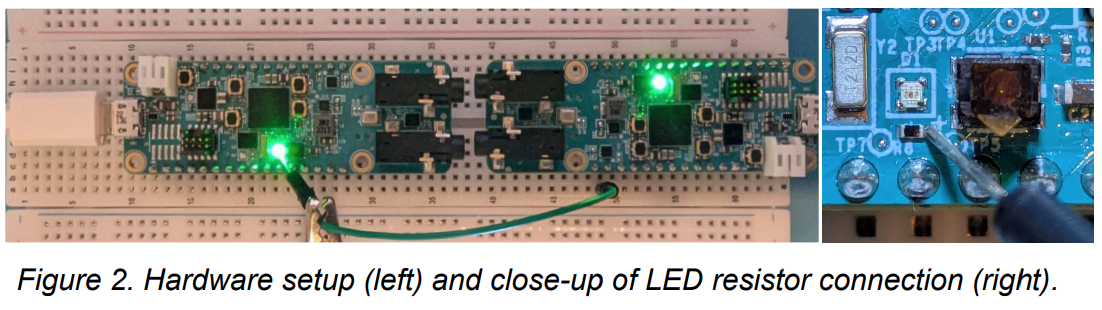
Image courtesy of the CCSF Team Poster