Writeup - Backdoor (DUCTF 2025)
DUCTF 2025 - Backdoor
Description
1 | Can you escape the void in my backdoor? Creds are `ctf:ctf` |
Writeup
This was my first time trying a kernel pwn problem in a CTF, so I will be documenting my entire solve thought process. While many intro to kernel pwn writeups/tutorials/blogs already exist (and are likely better than mine), I’m writing this to retain the information myself and just add to the pile. My writeup will be intended for those who have done userspace pwn quite a bit, but never gotten into kernel pwn before.
I also have to note that I didn’t solve this challenge during the actual CTF, but was able to upsolve it afterwards using some help from other writeups:
Intro to Kernel Pwn
Kernel pwn is about exploiting the same vulnerabilities present in userland (buffer overflows, UAFs, etc.) but in kernelland. The layout, protections, and interactions are all different in the kernel, but they all deal with privilged code running in the context of the kernel. Interacting with kernel code usually happens through:
- Interactions with a kernel module (ref1, ref2, ref3)
- System calls (our challenge)
- Page faults
- Signals
- etc.
In our case, the kernel source code was patched to add a new system call. System calls (ref), or syscalls, are part of an API that allows unprivileged user applications to make requests to the kernel. If the application wants to interact with hardware in a way that requires privileged access, system calls with specific register arguments are made when the syscall instruction is ran, and the kernel picks up code execution from that point.
When doing kernel pwn, files are typically provided that are different from userland exploitation:
bzImageorvmlinuz- the linux kernel (vmlinux, note the “x”) is a large file, so typically a compressed version is given to participants- If only the
bzImage/vmlinuzis provided, you would extract thevmlinuxfile for reference in your exploit
- If only the
rootfs.cpio.gzorinitramfs.cpio.gz- the linux kernel needs a filesystem to attach with basic utilities, commands, and libraries. These are combined together into a compressed CPIO archiverun.sh- oftentimes a bash script is included with the properqemu-systemcommand (ref) to emulate the OS properly and specify the kernel mitigations the author wants active
Userland exploits typically use something like pwntools to remotely send data over the network and interact with a vulnerable executable. Kernel pwn is different as the attacker has unprivileged access to a device, and can therefore run arbitrary instructions. This means the exploit is typically a compiled ELF written in C or assembly that’s transferred to the system and ran.
When emulating with QEMU, the easiest way to get your exploit ELF onto the box is to unpack the CPIO archive into a directory, add your exploit, and recompile the CPIO archive. I typically use the files provided in the Wohin writeup as my starting point: decompress_cpio.sh and compile_exp_and_compress_cpio.sh.
Additionally, it’s nice to have root access into the QEMU-emulated OS to debug exploits. This is often done by adding commands like setuidgid 0 /bin/sh in a setup script or modifying the root password hash in /etc/shadow.
Although more useful for creating kernel exploitation problems, here’s a quick guide by ir0nstone about compiling the kernel and kernel modules.
Lastly, I used pwndbg as my GDB plugin since it has many, nice kernel-based features that aren’t present in plugins like GEF. To debug the kernel, add the -s option to the qemu-system command (which spins up gdbserver on localhost:1234), then run pwndbg ./vmlinux in another terminal and inside put target remote :1234 to connect to the kernel.
Intro to the Problem
Inside the attached backdoor.tar.gz archive was the bzImage compressed kernel, vmlinux uncompressed kernel, run.sh script with the qemu-system command, and a kernel.diff file that showed how the kernel source code was modified. The kernel diff showed that a new syscall called “backdoor” (1337) was added:
1 |
|
This syscall creates a new kernel page with RWX permissions and copies user-provided shellcode into it. It then clears all the registers including xmm registers and jumps to the page. This gives us arbitrary shellcode execution of up to 0x1000 bytes in the kernel but without any pre-initialized register values.
Additionally, the run.sh script included the lines -cpu qemu64,+smep,+smap and -append "console=ttyS0 quiet kaslr kpti=1 pti=on panic=0 oops=panic", meaning that SMAP, SMEP, kASLR, and KPTI were all enabled (ref1, ref2). Lastly, running uname -a inside revealed it was running kernel version 6.16.0-rc2, which is the latest version.
There are a number of ways to escalate privileges (which we will cover later), but they all rely on running functions or modifying structs located in kernel memory. Since kASLR was enabled and all registers were cleared, we did not have any addresses to use as a base to access those functions (or so I thought).
I decided to write my exploit in assembly this time as interacting with the syscall and writing the shellcode was all assembly, meaning there really wasn’t any C to write. I used my add_exp.sh script which would automatically compile and move my exploit into the rootfs and recompress the FS:
1 |
|
Solve Path
Alright, so we have arbitrary shellcode execution in the kernel, but no kernel addresses. This either meant we had to figure out some way to spawn a shell/ORW the flag without kernel functions, or we had to figure out how to bypass kASLR.
My first thought was to see what other hardware registers existed and find one with a kernel address. I quickly came upon $gs_base, which is a CPU-specific register with an address that points to per-CPU data. While this had an address in kernelspace, it did not directly point to anything and the offsets to kernelspace were not constant. Despite what ChatGPT and other resources online were telling me, $gs_base was not directly tied to anything. I also searched through the kernel image and found every reference to gs: included another register inside. As an example, it never had gs:0x10, it only had gs:[rip + 0x10] or something similar. Therefore, without those registers, I couldn’t reach an actual reliable kernel address.
What I didn’t know until later was that not only could I use the $rip register, there’s another MSR called LSTAR (IA32_LSTAR) that also contains a kernel address. The address that LSTAR contains is the entry_SYSCALL_64 symbol, which is 0x80 bytes ahead of the kernel .text section base address.
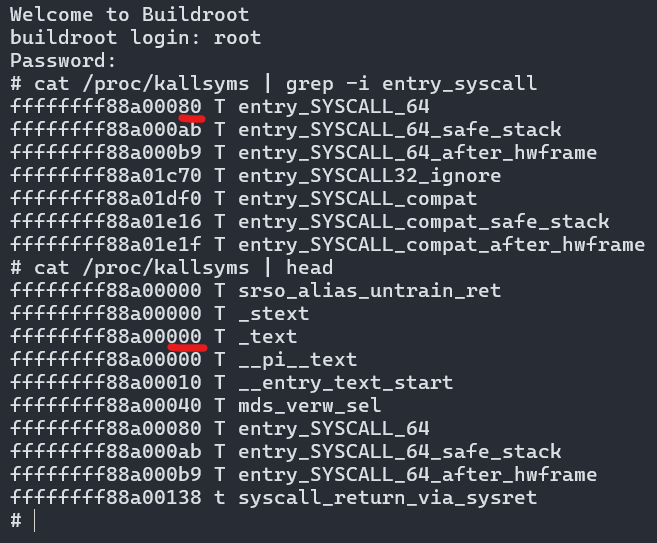
/proc/kallsyms is only reachable by the root user but contains all kernel symbols and their addresses.
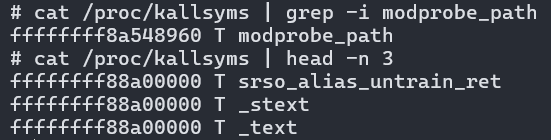
Now that we have the kernel base address, there’s a number of avenues we can take to get what we want. The most common avenue is commit_creds(kernel_prepare_cred()) (ref) or overwriting a cred struct (ref), but the easiest way I read was modifying the modprobe_path global variable (ref). Since a longer and better explanation is already out there, just know that whenever a file of unknown type is executed, a series of calls is made, one of which is call_modprobe(). This function ends up calling call_usermodehelper_exec() which runs modprobe_path as root. Therefore, by modifying that path in kernel memory, we can specify an attacker-controlled file to be ran as root.
Therefore, in our exploit we can write shellcode that calculates the offset to modprobe_path from the base address and writes an attacker-controlled path such as /tmp/x, then returns to userspace (exp.S, exp)
1 | ; put IA32_LSTAR MSR address into rax |
To get the flag, you’d run the following commands:
1 | /tmp/exp |
Final solve script:
1 | from pwn import * |
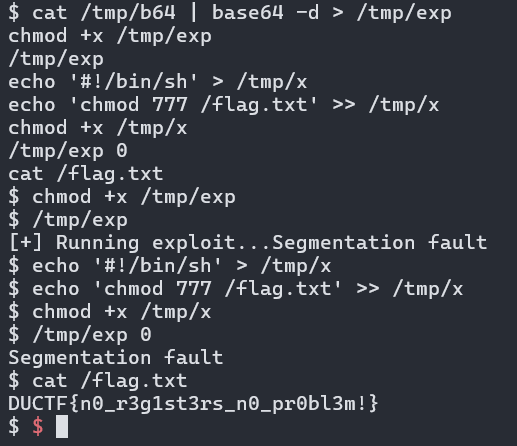
Flag: DUCTF{n0_r3g1st3rs_n0_pr0bl3m!}